➜ flutter doctor Doctor summary (to see all details, run flutter doctor -v): [✓] Flutter (Channel stable, v1.0.0, on Mac OS X 10.14.3 18D109, locale zh-Hans-CN) [!] Android toolchain - develop for Android devices ✗ No valid Android SDK platforms found in /usr/local/Caskroom/android-platform-tools/latest/platforms. Directory was empty. [!] iOS toolchain - develop for iOS devices (Xcode 10.1) ✗ Xcode requires additional components to be installed in order to run. Launch Xcode and install additional required components when prompted. ✗ libimobiledevice and ideviceinstaller are not installed. To install with Brew, run: brew update brew install --HEAD usbmuxd brew link usbmuxd brew install --HEAD libimobiledevice brew install ideviceinstaller ✗ ios-deploy not installed. To install with Brew: brew install ios-deploy ✗ CocoaPods not installed. CocoaPods is used to retrieve the iOS platform side's plugin code that responds to your plugin usage on the Dart side. Without resolving iOS dependencies with CocoaPods, plugins will not work on iOS. For more info, see https://flutter.io/platform-plugins To install: brew install cocoapods pod setup [!] Android Studio (not installed) [!] VS Code (version 1.31.1) [!] Connected device ! No devices available
➜ flutter doctor Doctor summary (to see all details, run flutter doctor -v): [✓] Flutter (Channel stable, v1.0.0, on Mac OS X 10.14.3 18D109, locale zh-Hans-CN) [!] Android toolchain - develop for Android devices ✗ No valid Android SDK platforms found in /usr/local/Caskroom/android-platform-tools/latest/platforms. Directory was empty. [!] iOS toolchain - develop for iOS devices (Xcode 10.1) ✗ libimobiledevice and ideviceinstaller are not installed. To install with Brew, run: brew update brew install --HEAD usbmuxd brew link usbmuxd brew install --HEAD libimobiledevice brew install ideviceinstaller ✗ ios-deploy not installed. To install with Brew: brew install ios-deploy ✗ CocoaPods not installed. CocoaPods is used to retrieve the iOS platform side's plugin code that responds to your plugin usage on the Dart side. Without resolving iOS dependencies with CocoaPods, plugins will not work on iOS. For more info, see https://flutter.io/platform-plugins To install: brew install cocoapods pod setup [!] Android Studio (not installed) [✓] VS Code (version 1.31.1) [✓] Connected device (1 available)
➜ flutter doctor Doctor summary (to see all details, run flutter doctor -v): [✓] Flutter (Channel stable, v1.0.0, on Mac OS X 10.14.3 18D109, locale zh-Hans-CN) [!] Android toolchain - develop for Android devices (Android SDK 28.0.3) ✗ Android licenses not accepted. To resolve this, run: flutter doctor --android-licenses [!] iOS toolchain - develop for iOS devices (Xcode 10.1) ✗ libimobiledevice and ideviceinstaller are not installed. To install with Brew, run: brew update brew install --HEAD usbmuxd brew link usbmuxd brew install --HEAD libimobiledevice brew install ideviceinstaller ✗ ios-deploy not installed. To install with Brew: brew install ios-deploy ✗ CocoaPods not installed. CocoaPods is used to retrieve the iOS platform side's plugin code that responds to your plugin usage on the Dart side. Without resolving iOS dependencies with CocoaPods, plugins will not work on iOS. For more info, see https://flutter.io/platform-plugins To install: brew install cocoapods pod setup [✓] Android Studio (version 3.3) ✗ Flutter plugin not installed; this adds Flutter specific functionality. ✗ Dart plugin not installed; this adds Dart specific functionality. [✓] VS Code (version 1.31.1) [!] Connected device ! No devices available
[!] Android toolchain - develop for Android devices (Android SDK 28.0.3) ✗ Android licenses not accepted. To resolve this, run: flutter doctor --android-licenses
直接执行命令:
1 2 3 4 5 6
➜ flutter doctor --android-licenses Warning: File /Users/xyz/.android/repositories.cfg could not be loaded.. 6 of 6 SDK package licenses not accepted. 100% Computing updates... Review licenses that have not been accepted (y/N)? ... ...
➜ flutter doctor Doctor summary (to see all details, run flutter doctor -v): [✓] Flutter (Channel stable, v1.0.0, on Mac OS X 10.14.3 18D109, locale zh-Hans-CN) [✓] Android toolchain - develop for Android devices (Android SDK 28.0.3) [!] iOS toolchain - develop for iOS devices (Xcode 10.1) ✗ libimobiledevice and ideviceinstaller are not installed. To install with Brew, run: brew update brew install --HEAD usbmuxd brew link usbmuxd brew install --HEAD libimobiledevice brew install ideviceinstaller ✗ ios-deploy not installed. To install with Brew: brew install ios-deploy ✗ CocoaPods not installed. CocoaPods is used to retrieve the iOS platform side's plugin code that responds to your plugin usage on the Dart side. Without resolving iOS dependencies with CocoaPods, plugins will not work on iOS. For more info, see https://flutter.io/platform-plugins To install: brew install cocoapods pod setup [✓] Android Studio (version 3.3) ✗ Flutter plugin not installed; this adds Flutter specific functionality. ✗ Dart plugin not installed; this adds Dart specific functionality. [✓] VS Code (version 1.31.1) [!] Connected device ! No devices available
! Doctor found issues in 2 categories.
发现 [✓] Android toolchain 配置成功了。
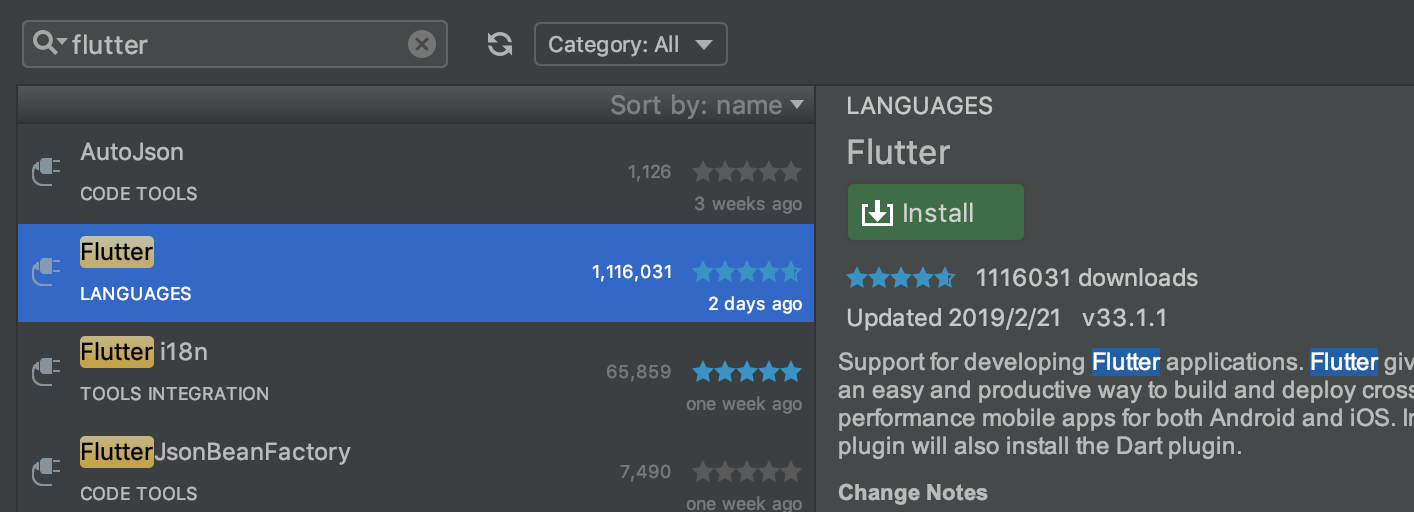
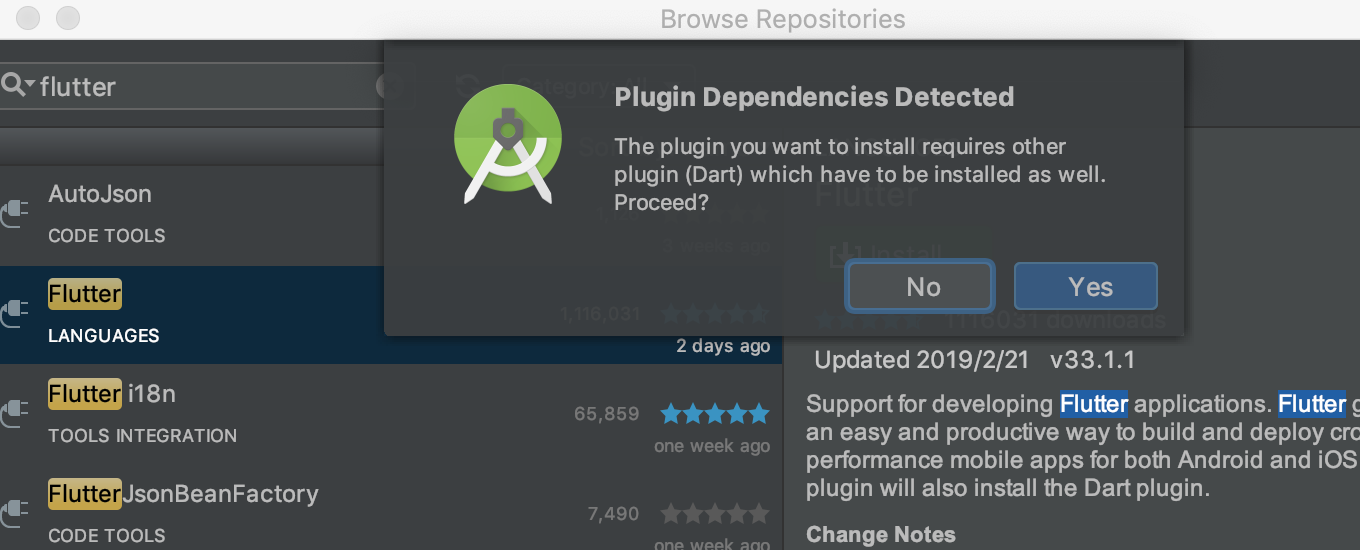
安装Flutter插件
看上面的错误提示:
1 2 3
[✓] Android Studio (version 3.3) ✗ Flutter plugin not installed; this adds Flutter specific functionality. ✗ Dart plugin not installed; this adds Dart specific functionality.
看提示,需要在 Android Studio 中安装两个必要的插件:Flutter plugin 和 Dart plugin
➜ flutter doctor Doctor summary (to see all details, run flutter doctor -v): [✓] Flutter (Channel stable, v1.0.0, on Mac OS X 10.14.3 18D109, locale zh-Hans-CN) [✓] Android toolchain - develop for Android devices (Android SDK 28.0.3) [!] iOS toolchain - develop for iOS devices (Xcode 10.1) ✗ libimobiledevice and ideviceinstaller are not installed. To install with Brew, run: brew update brew install --HEAD usbmuxd brew link usbmuxd brew install --HEAD libimobiledevice brew install ideviceinstaller ✗ ios-deploy not installed. To install with Brew: brew install ios-deploy ✗ CocoaPods not installed. CocoaPods is used to retrieve the iOS platform side's plugin code that responds to your plugin usage on the Dart side. Without resolving iOS dependencies with CocoaPods, plugins will not work on iOS. For more info, see https://flutter.io/platform-plugins To install: brew install cocoapods pod setup [✓] Android Studio (version 3.3) [✓] VS Code (version 1.31.1) [!] Connected device ! No devices available
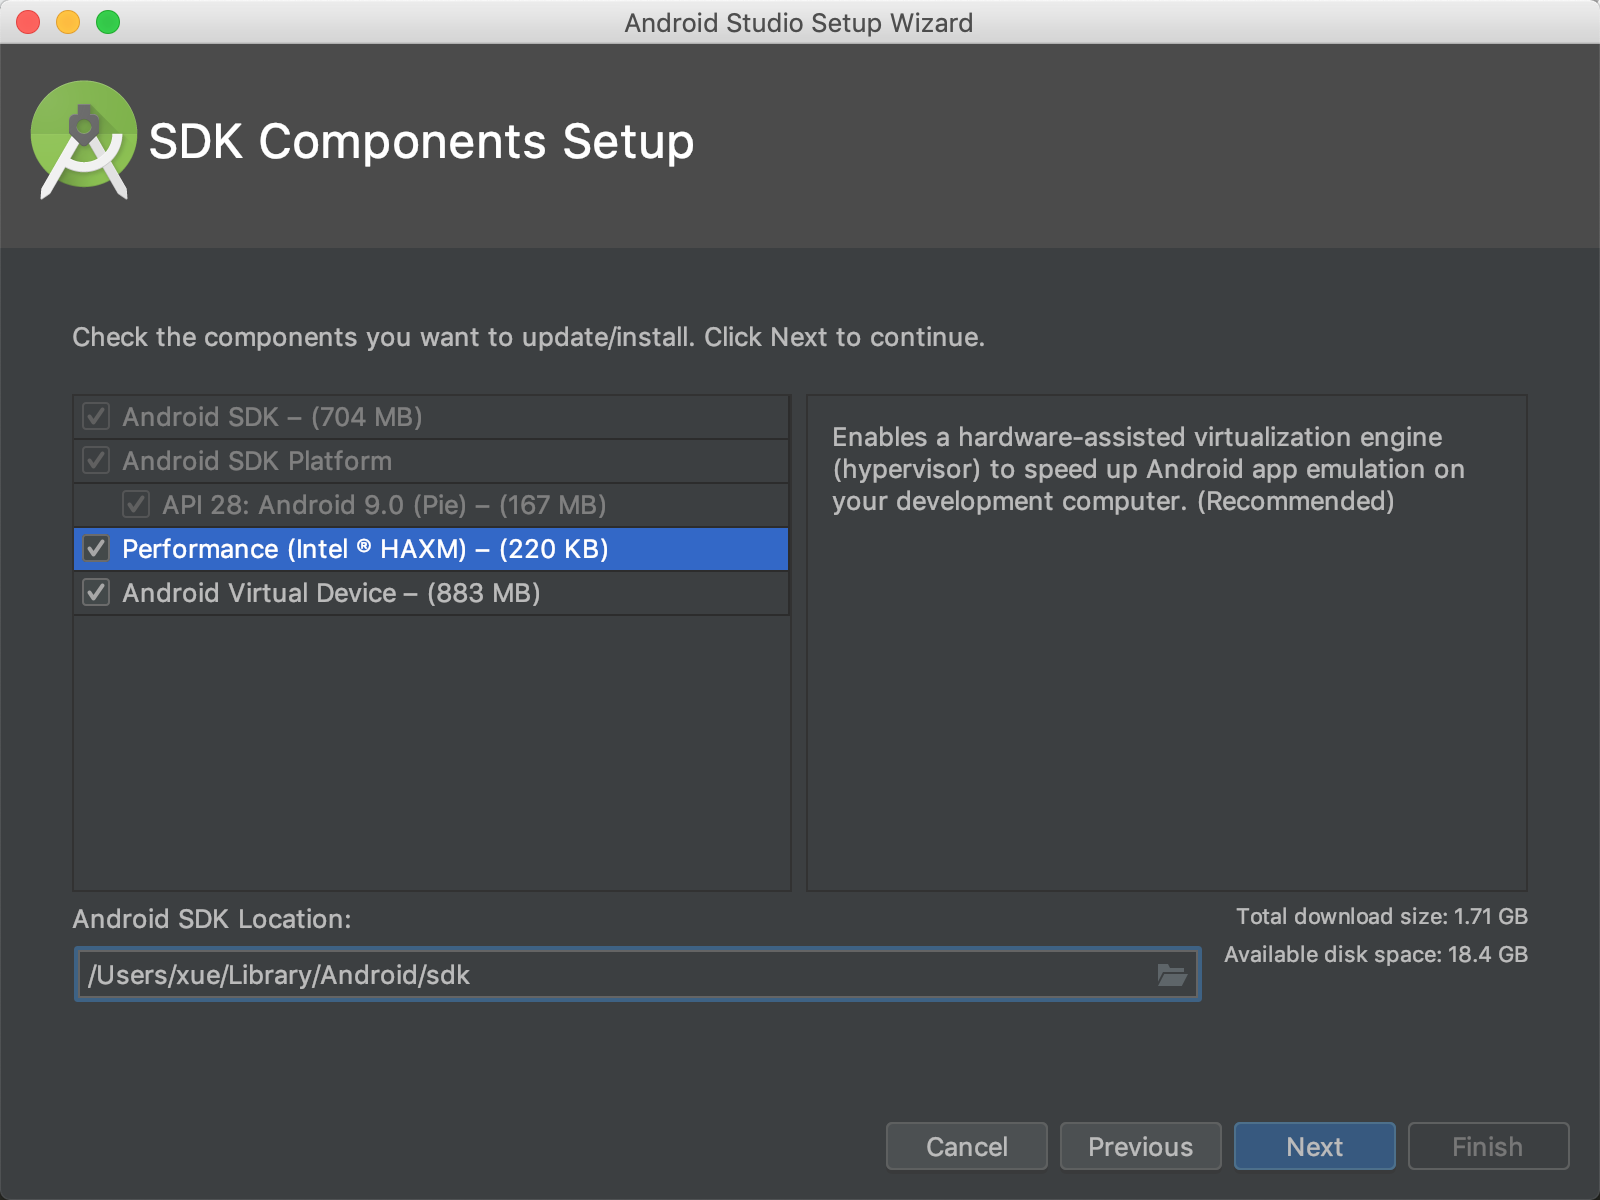
使用 Android Studio 创建 Flutter 项目也非常便捷。直接选择启动页中的 Start a new Flutter project 菜单,然后选择 Flutter Application – Next – 输入 Project name 及保存目录后,即可初始化一个 Flutter 项目。
连接Android真机运行
上面 Android 的环境已经配置好了,我就有些迫不及待的想要在手机上运行了。
跑起来
连接上安卓手机,开始运行 flutter run 命令:
1 2 3 4 5 6 7
➜ flutter run No connected devices.
Run 'flutter emulators' to list and start any available device emulators.
If you expected your device to be detected, please run "flutter doctor" to diagnose potential issues, or visit https://flutter.io/setup/ for troubleshooting tips.
结果却提示 No connected devices 。根据提示,执行:
1 2 3 4 5 6 7 8 9 10 11 12
➜ flutter emulators 2 available emulators:
Nexus_5X_API_28_x86 • Nexus 5X • Google • Nexus 5X API 28 x86 apple_ios_simulator • iOS Simulator • Apple
To run an emulator, run 'flutter emulators --launch <emulator id>'. To create a new emulator, run 'flutter emulators --create [--name xyz]'.
You can find more information on managing emulators at the links below: https://developer.android.com/studio/run/managing-avds https://developer.android.com/studio/command-line/avdmanager
➜ adb devices List of devices attached adb server version (40) doesn't match this client (39); killing... * daemon started successfully FA6AB0311758 device
➜ flutter doctor Doctor summary (to see all details, run flutter doctor -v): [✓] Flutter (Channel stable, v1.0.0, on Mac OS X 10.14.3 18D109, locale zh-Hans-CN) [!] Android toolchain - develop for Android devices (Android SDK 28.0.3) ✗ Android license status unknown. [✓] Android Studio (version 3.3) 。。。 。。。
解决方法是:再执行一次 flutter doctor --android-licenses 命令,在提示后输入 y 确认,然后再通过 flutter doctor 查看。
再次执行 flutter run 命令进行安装,此时手机上会弹出 USB安装提示 的命令,选择 允许 即可
1 2 3 4 5 6 7 8 9 10 11 12 13
➜ flutter run Launching lib/main.dart on Redmi Note 4X in debug mode... Initializing gradle... 0.8s Resolving dependencies... 1.5s Gradle task 'assembleDebug'... Gradle task 'assembleDebug'... Done 1.5s Built build/app/outputs/apk/debug/app-debug.apk. Installing build/app/outputs/apk/app.apk... 14.6s Syncing files to device Redmi Note 4X... 1.6s
🔥 To hot reload changes while running, press "r". To hot restart (and rebuild state), press "R". An Observatory debugger and profiler on Redmi Note 4X is available at: http://127.0.0.1:61766/ For a more detailed help message, press "h". To detach, press "d"; to quit, press "q".
➜ flutter doctor Doctor summary (to see all details, run flutter doctor -v): [✓] Flutter (Channel stable, v1.0.0, on Mac OS X 10.14.3 18D109, locale zh-Hans-CN) [✓] Android toolchain - develop for Android devices (Android SDK 28.0.3) [!] iOS toolchain - develop for iOS devices (Xcode 10.1) ✗ libimobiledevice and ideviceinstaller are not installed. To install with Brew, run: brew update brew install --HEAD usbmuxd brew link usbmuxd brew install --HEAD libimobiledevice brew install ideviceinstaller ✗ ios-deploy not installed. To install with Brew: brew install ios-deploy ✗ CocoaPods not installed. CocoaPods is used to retrieve the iOS platform side's plugin code that responds to your plugin usage on the Dart side. Without resolving iOS dependencies with CocoaPods, plugins will not work on iOS. For more info, see https://flutter.io/platform-plugins To install: brew install cocoapods pod setup [✓] Android Studio (version 3.3) [✓] VS Code (version 1.31.1) [✓] Connected device (1 available)
! Doctor found issues in 1 category.
打开 VS Code, 在终端中运行 flutter run 命令:
1 2 3 4 5 6 7 8 9 10 11 12 13
➜ flutter run Launching lib/main.dart on Pixel in debug mode... Initializing gradle... 1.1s Resolving dependencies... 8.2s Gradle task 'assembleDebug'... Gradle task 'assembleDebug'... Done 12.4s Built build/app/outputs/apk/debug/app-debug.apk. Installing build/app/outputs/apk/app.apk... 3.4s Syncing files to device Pixel... 1.5s
🔥 To hot reload changes while running, press "r". To hot restart (and rebuild state), press "R". An Observatory debugger and profiler on Pixel is available at: http://127.0.0.1:49724/ For a more detailed help message, press "h". To detach, press "d"; to quit, press "q".
可以看到,现在才是正常运行的状态。已经成功的连接上了我的 Pixel 手机,同时在手机端,已经打开了示例app的界面。输入 r 来实现热更新。
➜ flutter doctor Doctor summary (to see all details, run flutter doctor -v): [✓] Flutter (Channel stable, v1.0.0, on Mac OS X 10.14.3 18D109, locale zh-Hans-CN) [✓] Android toolchain - develop for Android devices (Android SDK 28.0.3) [!] iOS toolchain - develop for iOS devices (Xcode 10.1) ✗ libimobiledevice and ideviceinstaller are not installed. To install with Brew, run: brew update brew install --HEAD usbmuxd brew link usbmuxd brew install --HEAD libimobiledevice brew install ideviceinstaller ✗ ios-deploy not installed. To install with Brew: brew install ios-deploy ✗ CocoaPods not installed. CocoaPods is used to retrieve the iOS platform side's plugin code that responds to your plugin usage on the Dart side. Without resolving iOS dependencies with CocoaPods, plugins will not work on iOS. For more info, see https://flutter.io/platform-plugins To install: brew install cocoapods pod setup [✓] Android Studio (version 3.3) [✓] VS Code (version 1.31.1) [✓] Connected device (1 available)
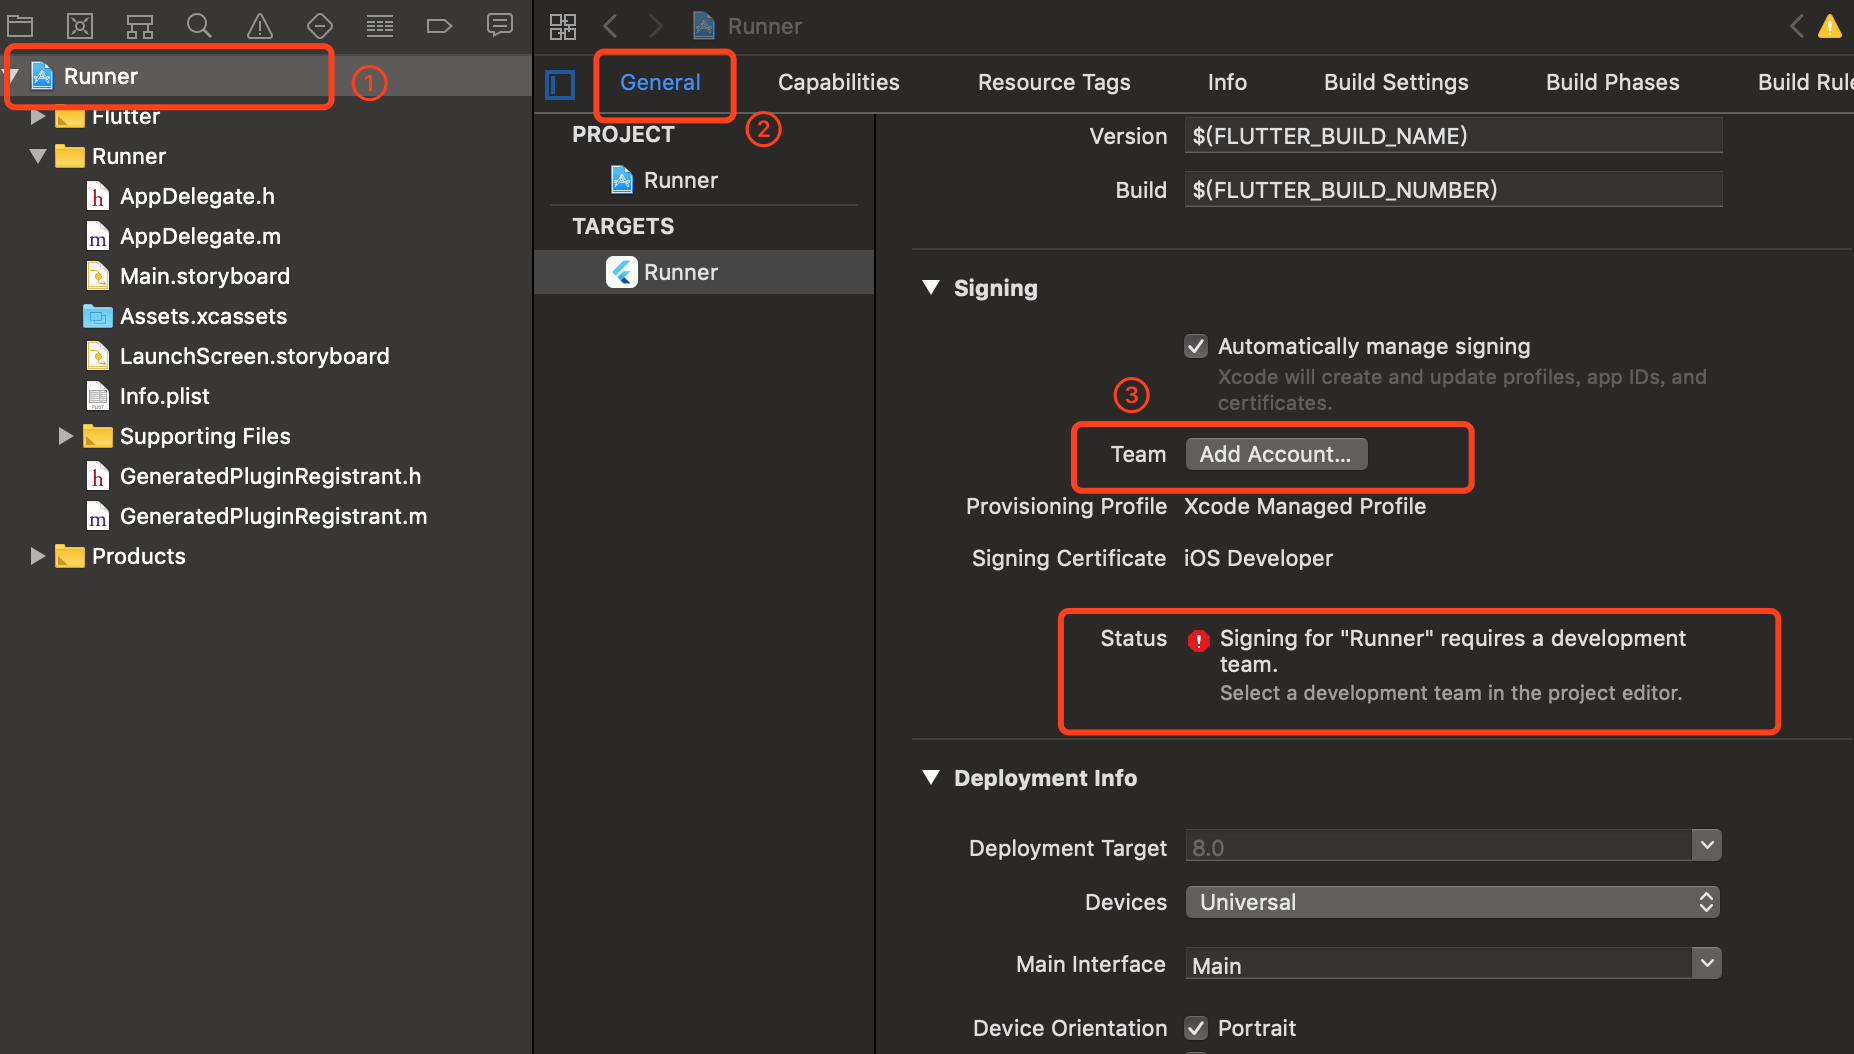
➜ flutter run Launching lib/main.dart on xyz的iPhone in debug mode... ════════════════════════════════════════════════════════════════════════════════ No valid code signing certificates were found You can connect to your Apple Developer account by signing in with your Apple ID in Xcode and create an iOS Development Certificate as well as a Provisioning Profile for your project by: 1- Open the Flutter project's Xcode target with open ios/Runner.xcworkspace 2- Select the 'Runner' project in the navigator then the 'Runner' target in the project settings 3- In the 'General' tab, make sure a 'Development Team' is selected. You may need to: - Log in with your Apple ID in Xcode first - Ensure you have a valid unique Bundle ID - Register your device with your Apple Developer Account - Let Xcode automatically provision a profile for your app 4- Build or run your project again 5- Trust your newly created Development Certificate on your iOS device via Settings > General > Device Management > [your new certificate] > Trust
For more information, please visit: https://developer.apple.com/library/content/documentation/IDEs/Conceptual/ AppDistributionGuide/MaintainingCertificates/MaintainingCertificates.html
Or run on an iOS simulator without code signing ════════════════════════════════════════════════════════════════════════════════ No development certificates available to code sign app for device deployment
➜ flutter run Launching lib/main.dart on xyz的iPhone in debug mode... Automatically signing iOS for device deployment using specified development team in Xcode project: 9Y41Q9PF28 Starting Xcode build... Xcode build done. 1.3s Failed to build iOS app Error output from Xcode build: ↳ ** BUILD FAILED **
Xcode's output: ↳ === BUILD TARGET Runner OF PROJECT Runner WITH CONFIGURATION Debug === Code Signing Error: No profiles for 'com.example.helloWorld' were found: Xcode couldn't find any iOS App Development provisioning profiles matching 'com.example.helloWorld'. Automatic signing is disabled and unable to generate a profile. To enable automatic signing, pass -allowProvisioningUpdates to xcodebuild. Code Signing Error: Code signing is required for product type 'Application' in SDK 'iOS 12.1' Code Signing Error: Code signing is required for product type 'Application' in SDK 'iOS 12.1' Code Signing Error: Code signing is required for product type 'Application' in SDK 'iOS 12.1'
Could not build the precompiled application for the device.
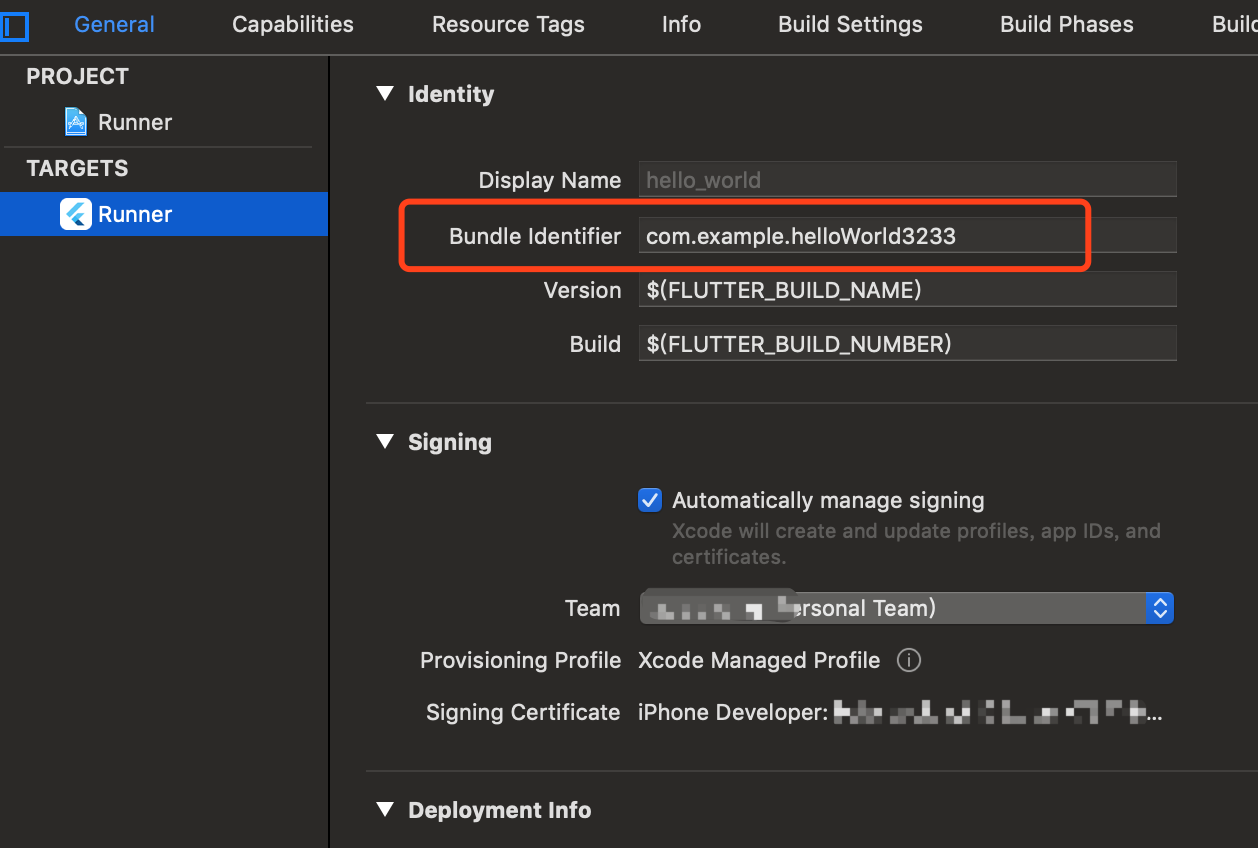
It appears that your application still contains the default signing identifier. Try replacing 'com.example' with your signing id in Xcode: open ios/Runner.xcworkspace
Error launching application on xyz的iPhone.
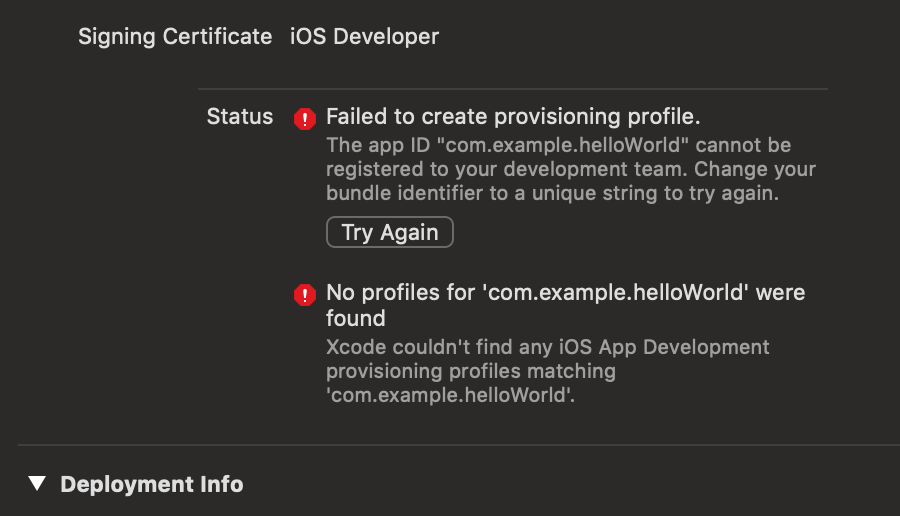
在 XCode中编译,提示如下错误:
1
2
3
4
5
6
7
Failed to create provisioning profile. The app ID "com.example.helloWorld" cannot be registered to your development team. Change your bundle identifier to a unique string to try again.
No profiles for 'com.example.helloWorld' were found: Xcode couldn't find any iOS App Development provisioning profiles matching 'com.example.helloWorld'.
Code signing is required for product type 'Application' in SDK 'iOS 12.1' Code signing is required for product type 'Application' in SDK 'iOS 12.1' Code signing is required for product type 'Application' in SDK 'iOS 12.1'
➜ flutter run Launching lib/main.dart on xyz的iPhone in debug mode... Automatically signing iOS for device deployment using specified development team in Xcode project: 9Y41Q9PF28 Starting Xcode build... ├─Assembling Flutter resources... 1.3s └─Compiling, linking and signing... 3.4s Xcode build done. 6.2s Installing and launching... 4.6s ⢿2019-02-24 17:17:33.270 ios-deploy[15328:80609] [ !! ] Unable to locate DeviceSupport directory with suffix 'Symbols'. This probably means you don't have Xcode installed, you will need to launch the app manually and logging output will not be shown! 6.8s Could not install build/ios/iphoneos/Runner.app on f1b5b10369882093413772c363995b5cda163c34. Try launching Xcode and selecting "Product > Run" to fix the problem: open ios/Runner.xcworkspace
Error launching application on xyz的iPhone.
Device is locked
使用 XCode编译,提示如下错误:
这个问题是需要在手机端开启允许调试。
依次点击 通用 – 设备管理 – 开发者应用 – 点击开发者账号 – 点击 信任应用
再次在 VS Code 中运行:
1 2 3 4 5 6 7 8 9 10 11 12 13 14 15 16 17
➜ flutter run Launching lib/main.dart on xyz的iPhone in debug mode... Automatically signing iOS for device deployment using specified development team in Xcode project: 9Y41Q9PF28 Starting Xcode build... ├─Assembling Flutter resources... 1.4s └─Compiling, linking and signing... 4.6s Xcode build done. 7.7s Installing and launching... 6.1s 12.0s Syncing files to device xyz的iPhone... 1.7s
🔥 To hot reload changes while running, press "r". To hot restart (and rebuild state), press "R". An Observatory debugger and profiler on xyz的iPhone is available at: http://127.0.0.1:1024/ For a more detailed help message, press "h". To detach, press "d"; to quit, press "q".
这次能够正常运行了,也支持热加载调试。
Flutter版本更新
对于Flutter的版本更新,看最近的形势迭代频率越来越快,而更新操作也很简单:
1 2 3 4 5 6 7 8 9 10 11 12 13 14 15 16 17 18
➜ flutter doctor ╔════════════════════════════════════════════════════════════════════════════╗ ║ A new version of Flutter is available! ║ ║ ║ ║ To update to the latest version, run "flutter upgrade". ║ ╚════════════════════════════════════════════════════════════════════════════╝
Doctor summary (to see all details, run flutter doctor -v): [✓] Flutter (Channel stable, v1.0.0, on Mac OS X 10.14.3 18D109, locale zh-Hans-CN) [✓] Android toolchain - develop for Android devices (Android SDK 28.0.3) [✓] iOS toolchain - develop for iOS devices (Xcode 10.1) [✓] Android Studio (version 3.3) [✓] VS Code (version 1.31.1) [!] Connected device ! No devices available